90 iPads in 90 Minutes
One minute per device is kind of amazing. I’m still really proud of this work.
Today was phase one of our new deployment. We received the shipment of iPad Pros (9.7”, 32GB, WiFi) that will make up two thirds of our deployment over the next three years.
I wanted to write in detail about the exact process of going from a pallet of cardboard boxes to 90 iPads ready to hand to students in around 90 minutes.
There are a few moving parts to this but they boil down to:
- Unboxing
- iOS Update
- MDM Enrolment
- User Assignment
Unboxing
I had the dedicated help of two colleagues to get through the unboxing, which is definitely the most tedious and time-consuming part of any sizeable iPad deployment.
Our devices came wrapped on a pallet but once I cut the wrapping, I discovered that almost every iPad was in an individual brown carton, inside which was an individual shrinkwrapped retail box.
So we settled into opening all these boxes. One person stripped the shrinkwrap, another pulled out and handed the iPad to me and then unwrapped and assembled each individual piece of the power adapter. The UK power adapter ships in two parts - presumably for space efficiency - and each has an individual plastic wrap on it. We just dropped the chargers into a big box and the cables into another to be picked later on deployment day.
The final point about unboxing is to note that I don’t really care who gets which device. At this point, they’re fungible as they’re all going to be set up in the same way.
iOS Update
To my surprise, these iPads all came with a very recent version of iOS: 9.3.2. If it wasn’t for the fact that Apple just released 9.3.3, today could have gone even quicker.
I decided to update all the devices to iOS 9.3.3 using Apple Configurator 2. I was going to plug them in anyway, so it seemed easy enough to just update them the same way.
Alternatively, since these devices are in DEP, I could have sent them an MDM command to update iOS. However, I didn’t see the point of generating all that WiFi traffic for nothing and, also, I wasn’t certain that that command would have an effect before the devices were fully set up.
So I plugged them into my Apple Configurator Mac, 20 at a time, and hit one button in Configurator. 10 minutes of playing Crossy Road later and it was time to move on.
MDM Enrolment
Our Device Enrolment Program was already set up and, while the devices were in transit, I had already allocated them to the correct PreStage Enrolment settings in our JAMF Casper Suite MDM server.
The slow way to proceed here is to:
- Pick up an iPad
- Connect it to WiFi
- Step through the setup assistant until enrolment is complete.
The smart way to proceed is:
- Create a blueprint in Apple Configurator 2 that automates the Actions > Prepare step
- Connect 20 devices to Apple Configurator 2
- Apply that blueprint
- Play another game of Crossy Road
As I said before in Towards Zero-Touch iOS Deployment, the game is: never touch the glass.
So once I worked my way through 90 iPads, 20 at a time, here’s what I had:
- All devices supervised
- All devices on the latest iOS version
- All devices enrolled in our Casper Suite
- All devices are named “iPad” in Casper and not allocated to any users yet
So the next phase is: allocate devices to users.
User Allocation
So at this point, I have 90 undifferentiated devices sitting in crates on a table. My next goal is to get those devices to:
- Be assigned to a user in Casper
- Be named with the full name of the user
- Have some way of showing on the device itself which user got which iPad
Here’s how I did it.
Firstly I exported from Casper a list of the serial numbers of all the enrolled iPads. I could have gotten this list from the DEP area in Apple School Manager, but I had four spare iPads which had not yet been enrolled and I didn’t fancy scanning through a list to find which four serial numbers to exclude.
Next, I combined this information with a CSV export from our student database for all the pupils in classes that will get the iPad Pro. At this point, I have a CSV that looks like:
username, full-name, graduation-year, role, device-serial-number
Graduation Year and Role are two extension attributes I use to group students in the JSS for scoping apps and profiles.
Next, I wrote a Python script for the JSS API that basically did the following:
- Parse the CSV file and for each row:
- Create a user in JSS with the given name, email address, graduation year and role
- Assign the device with the given serial number to that user
- Set the name of the device to the full name of the user
Having done that, I have a Configuration Profile ready that uses the new-in-iOS-9.3 payload called “Lock Screen Message”. This is scoped to every user that has the Role of “student”. Once the user is assigned to the device, the profile automatically appears on the device.
The magic sauce is that the message contained in the profile is customised for each individual user. Casper Suite allows you to use place holders in a Configuration Profile which are substituted with actual values before the profile is pushed to each device.
In this case, the lock screen message is as simple as “This iPad is allocated to $FULLNAME”. Here, $FULLNAME is the placeholder for the full name of the user.
The result is that each device gets a custom message on the lock screen - even before the iOS setup assistant has completed. At this point, I can just pick up each device, look at the soft asset tag on the display and put the iPad into the right class box.
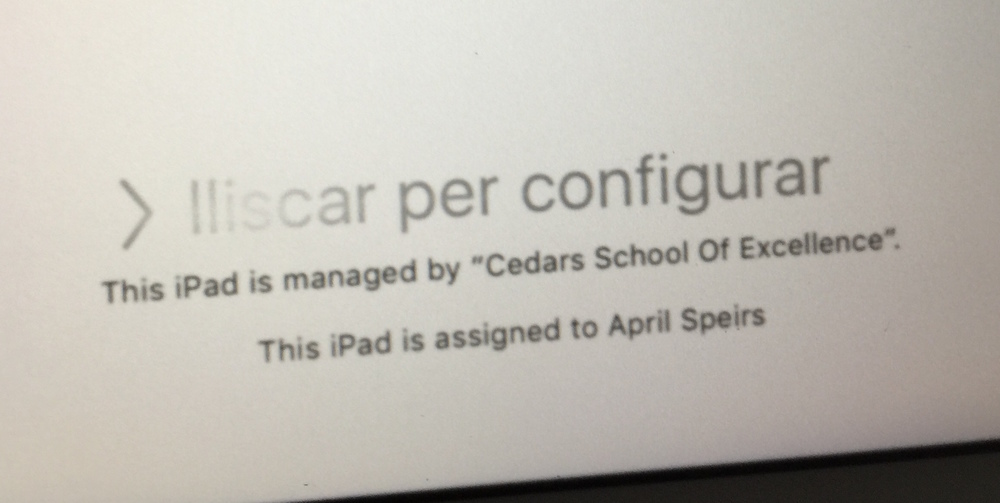
Excuse the fuzziness - we kept the plastic wraps on the devices while handling them.
The final result: 90 iPads updated, supervised, enrolled in MDM and allocated to users. Average time-per-iPad: one minute.